Did you know that 89% of professional orchestra positions require proven sight-reading skills? Learning to read sheet music transforms your musical journey from simply playing notes to truly understanding the language of music. This universal skill unlocks cognitive benefits, enhances collaboration across genres, and provides the structural foundation for genuine creative expression, moving you beyond limitations of playing by ear alone.
Mastering the Foundation: Sheet Music Basics
Now that we’ve explored the transformative power of reading music, let’s build that foundation. Think of sheet music as a map, and the symbols on it as your legend. Learning to read this map starts with understanding its most fundamental elements.
Understanding the Musical Staff
The staff is the canvas upon which all music is written. It’s a simple yet powerful system that allows us to visually represent pitch and rhythm.
The Building Blocks of Notation
At its core, the staff consists of five parallel lines and the four spaces between them. Both the lines and the spaces are used to place musical notes, and their vertical position tells you how high or low the note should be played. As you move up the staff, from the bottom line to the top space, the pitch ascends.
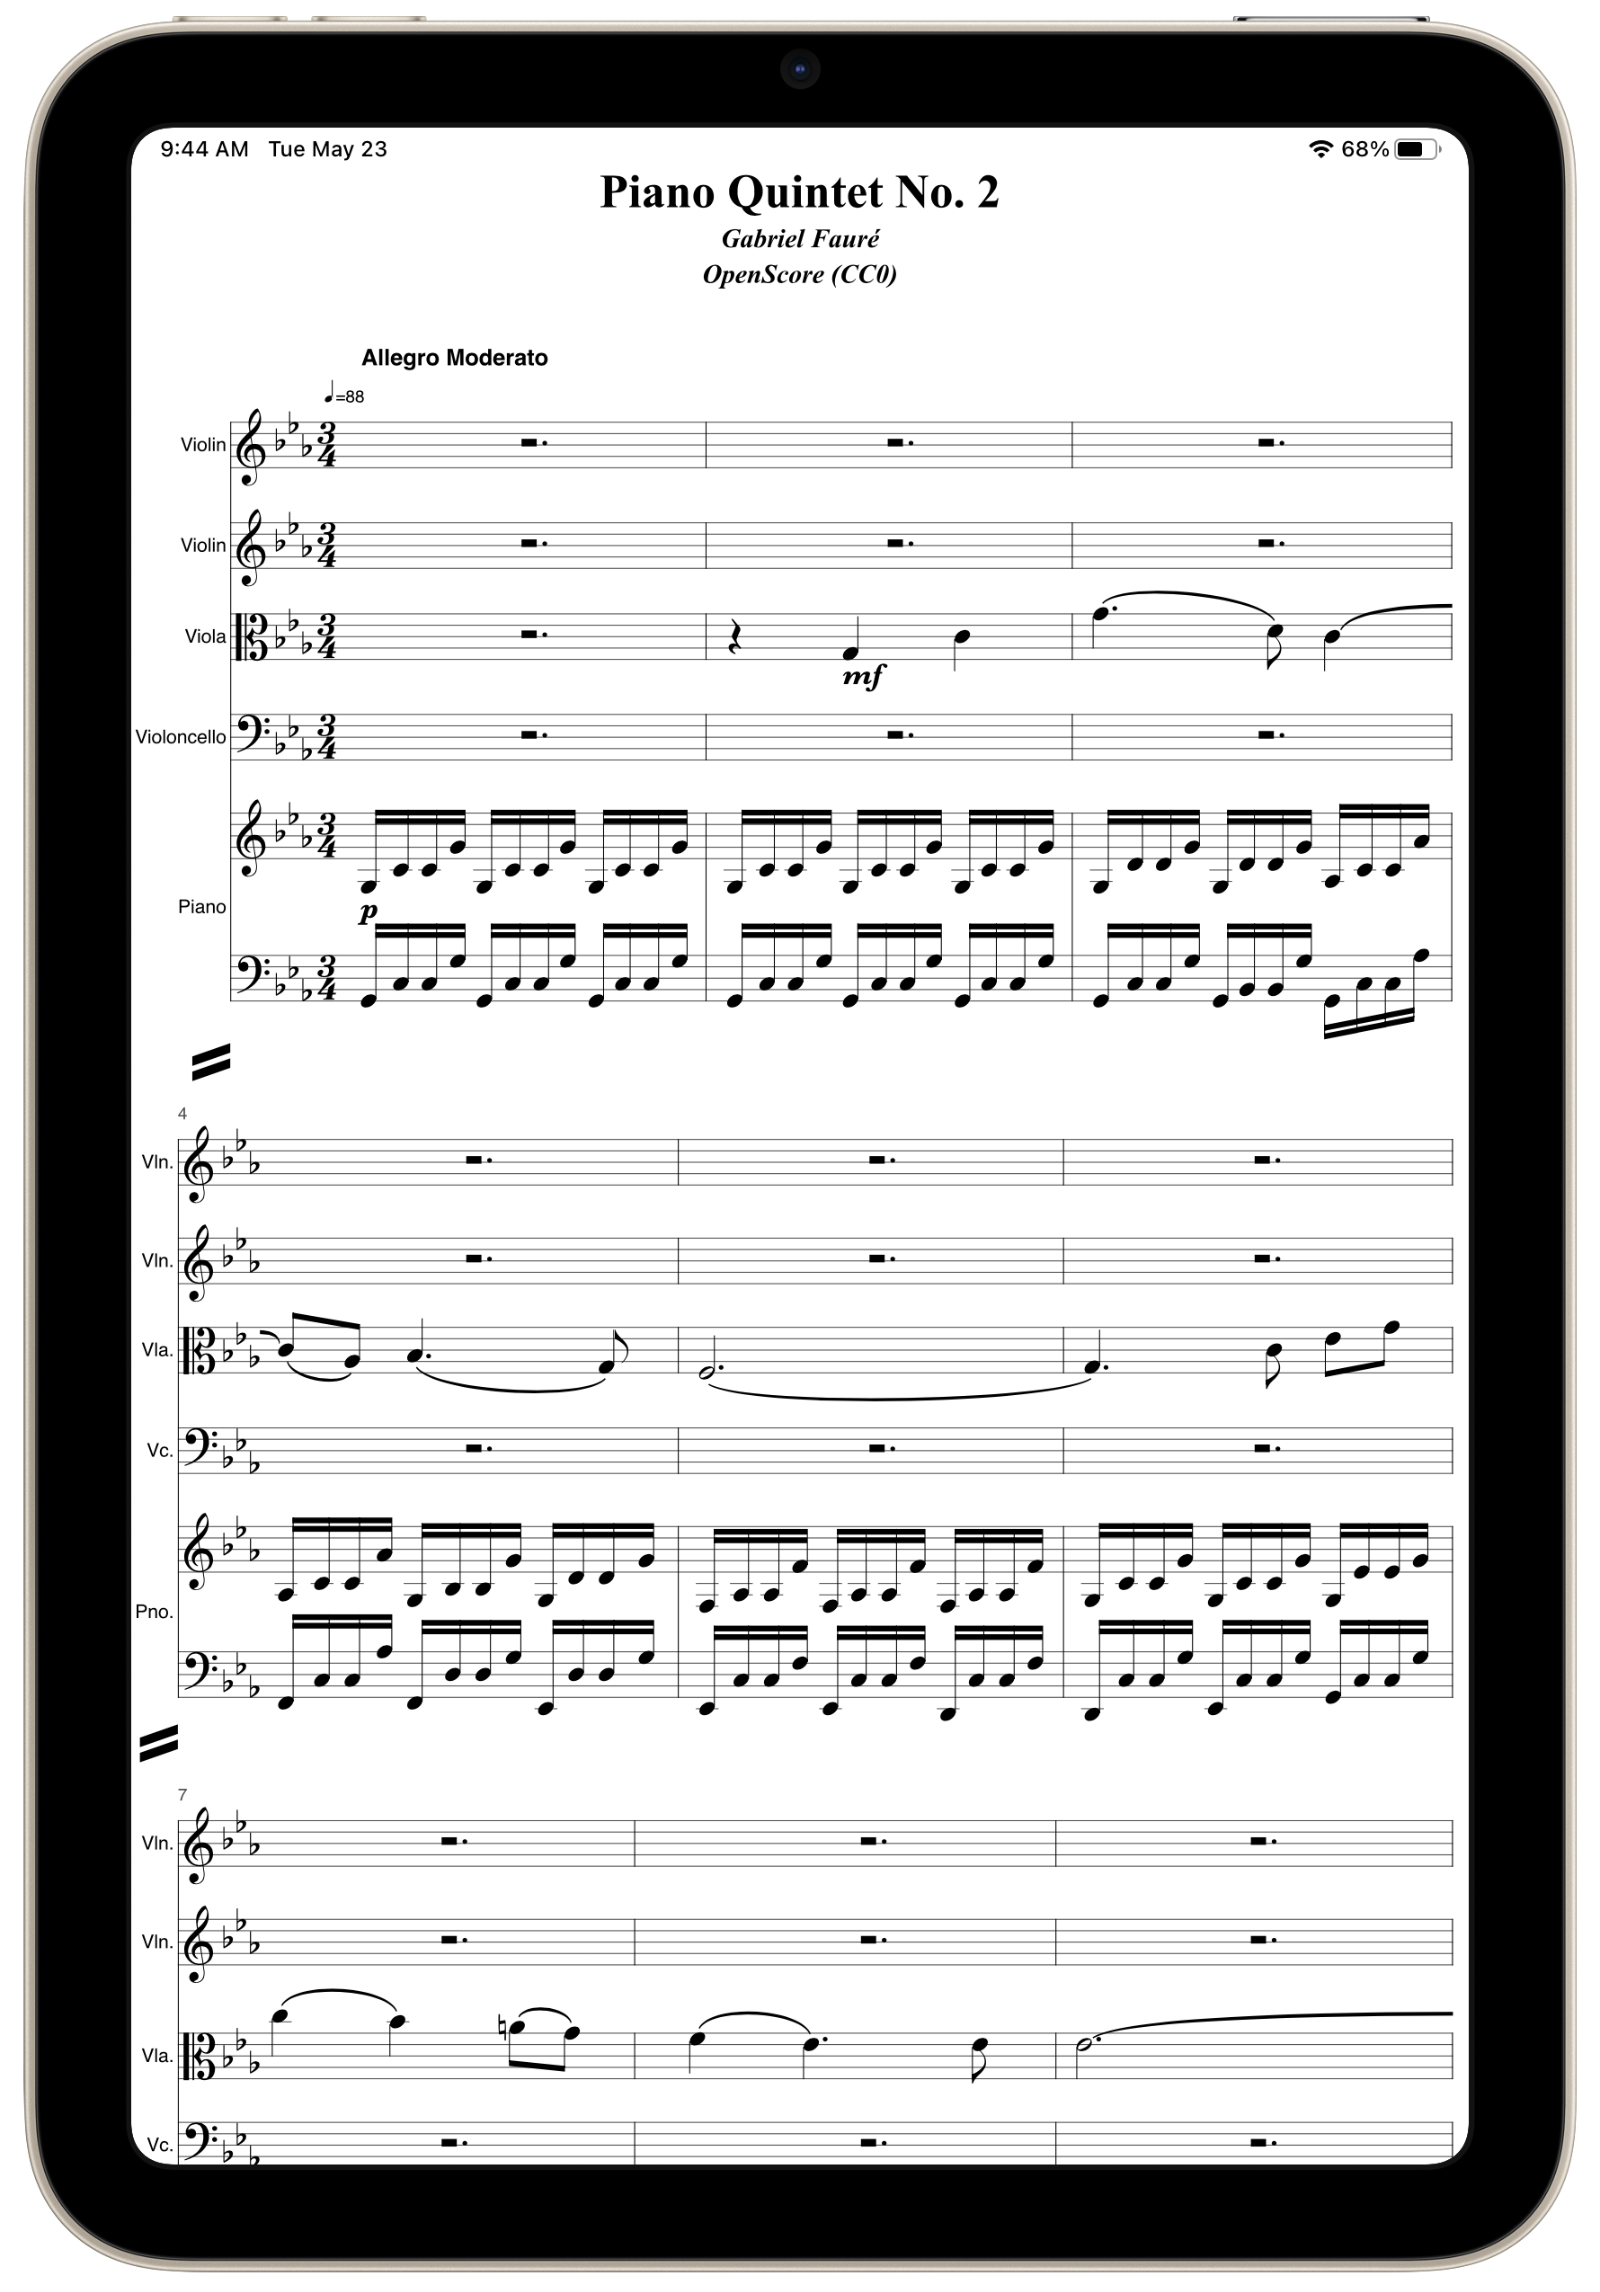
For instruments with a wide range, like the piano or harp, a single staff isn’t enough. This is where the grand staff comes into play. It is the combination of the treble clef staff and the bass clef staff, joined together by a brace. The treble clef staff (on top) is typically played by the right hand on the piano, and the bass clef staff (on the bottom) by the left hand, allowing the musician to read two interconnected lines of music simultaneously.
Ledger Lines and Their Purpose
What happens when you need to write a note that is too high or too low for the five lines of the staff? You use ledger lines. These are short, horizontal lines added above or below the staff to extend its range. Each ledger line acts like an imaginary temporary line for a single note.
A perfect and crucial example of this is Middle C. On the grand staff, Middle C is written on a short ledger line that sits precisely between the treble and bass clef staves. It’s the central note that connects the two staves, appearing one ledger line below the treble staff and one ledger line above the bass staff.
Clefs: Your Pitch Navigation System
The staff alone doesn’t tell you the specific pitches of the lines and spaces. This is the job of the clef, a symbol placed at the very beginning of every staff. The clef acts as a reference point, anchoring a specific pitch to a specific line, which in turn defines all the other notes.
Treble Clef Demystified
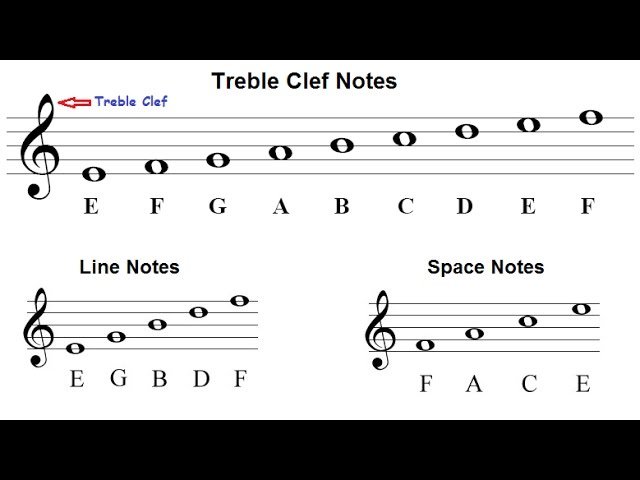
The treble clef, often called the G clef, is one of the most recognizable symbols in music. Its elegant design has a very specific purpose: the curl of the clef wraps around the second line from the bottom, designating that line as the note G above Middle C. This is why it’s called the G clef. The notes on the lines of the treble clef, from bottom to top, are E, G, B, D, F (a common mnemonic is “Every Good Boy Deserves Fruit”). The notes in the spaces spell out F, A, C, E (which conveniently forms the word “FACE”).
This clef is used for higher-pitched instruments and voices, such as the violin, flute, trumpet, and soprano singers. On the piano, the treble clef is almost always used for the right-hand part.
Bass Clef Essentials
The bass clef, or the F clef, handles the lower end of the musical spectrum. Its two dots are the key identifier: they are placed on either side of the fourth line from the bottom, designating that line as the F below Middle C. The notes on the lines of the bass clef are G, B, D, F, A (“Good Boys Do Fine Always”), and the spaces are A, C, E, G (“All Cows Eat Grass”).
This clef is essential for lower-pitched instruments like the cello, bassoon, trombone, and tuba. On the piano, the bass clef is standard for the left-hand part, providing the harmonic foundation for the music.
Note Reading Made Simple: From Symbols to Sound
Now that you understand the staff and clefs, it’s time to connect those symbols to the actual notes you play. This is where abstract knowledge becomes practical skill, transforming you from someone who deciphers music into someone who reads it.
Pitch Recognition Techniques
The goal of pitch recognition is to move from calculating what a note is to instantly knowing it. This requires building a strong connection between the note’s position on the staff and its name.
Mnemonic Devices That Actually Work
Mnemonic devices are classic learning tools for a reason—they work. They provide a verbal shortcut to help you memorize the note names on the lines and spaces until your brain internalizes them. Here are the most effective and widely used mnemonics:
| Clef | Position | Mnemonic | Notes |
|---|---|---|---|
| Treble Clef | Lines | Every Good Boy Deserves Fudge | E – G – B – D – F |
| Treble Clef | Spaces | (They spell) FACE | F – A – C – E |
| Bass Clef | Lines | Good Boys Do Fine Always | G – B – D – F – A |
| Bass Clef | Spaces | All Cows Eat Grass | A – C – E – G |
Use these phrases as your initial training wheels. With consistent practice, you’ll find that you rely on them less and less, as your brain starts to recognize the patterns directly.
Practical Note Reading Exercises
Knowing the theory is one thing; applying it fluidly is another. The following exercises are designed to build the speed and accuracy that fluent sight-reading requires.
Building Muscle Memory
Just like an athlete trains their body, a musician must train their brain for quick note recognition. Here are two powerful exercises to incorporate into your daily practice:
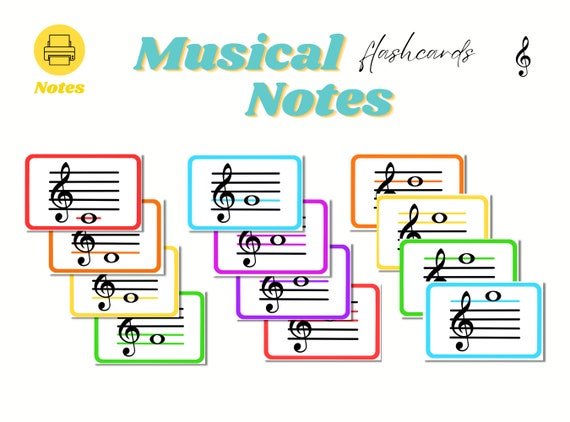
- Daily 5-Minute Drills: Note Flash Cards: This is one of the most effective methods. You can use physical cards or a flash card app. The key is consistency. Spending just five minutes every day reviewing cards will dramatically increase your recognition speed. Shuffle the deck regularly to ensure you’re not just memorizing an order.
- Progress Tracking: Speed Recognition Tests: Challenge yourself with timed tests. Use online note-naming games or have a friend point to random notes on a page of sheet music. Set a timer for one minute and see how many you can correctly identify. Track your score each week to see your tangible improvement. This not only builds speed but also confidence.
Common Pitfalls and How to Avoid Them
Many new musicians encounter the same hurdles. Recognizing them early allows you to build better habits from the start.
- Mistake: Writing Note Names on Sheet Music
It’s incredibly tempting to write the letter name under every single note in a piece. While this might help you get through one song, it ultimately hinders your progress. You end up reading the letters instead of the notes, preventing the development of a direct connection between the symbol on the staff and the key or string on your instrument. - Solution: Use Landmark Notes Instead
Instead of labeling everything, use a strategy employed by expert sight-readers: learn landmark notes. These are a few key notes that you memorize perfectly, which then act as reference points to figure out other notes by interval (distance). Essential landmark notes to start with are:- Treble Clef: G (on the second line, the clef’s home), Middle C (first ledger line below), and High C (third space).
- Bass Clef: F (on the fourth line, between the clef’s dots), Middle C (first ledger line above), and Low C (second space).
When you see an unknown note, find the nearest landmark note and count up or down the lines and spaces to find your answer. This method is faster and more musical than relying on a mnemonic for every single note and is a crucial step toward true fluency.
Rhythm Fundamentals: The Heartbeat of Music
Pitch tells you what to play, but rhythm tells you when to play it. It’s the heartbeat that gives music its pulse, energy, and flow. Understanding rhythm is just as crucial as knowing your notes, and it begins with learning the basic durations.
Understanding Note Values
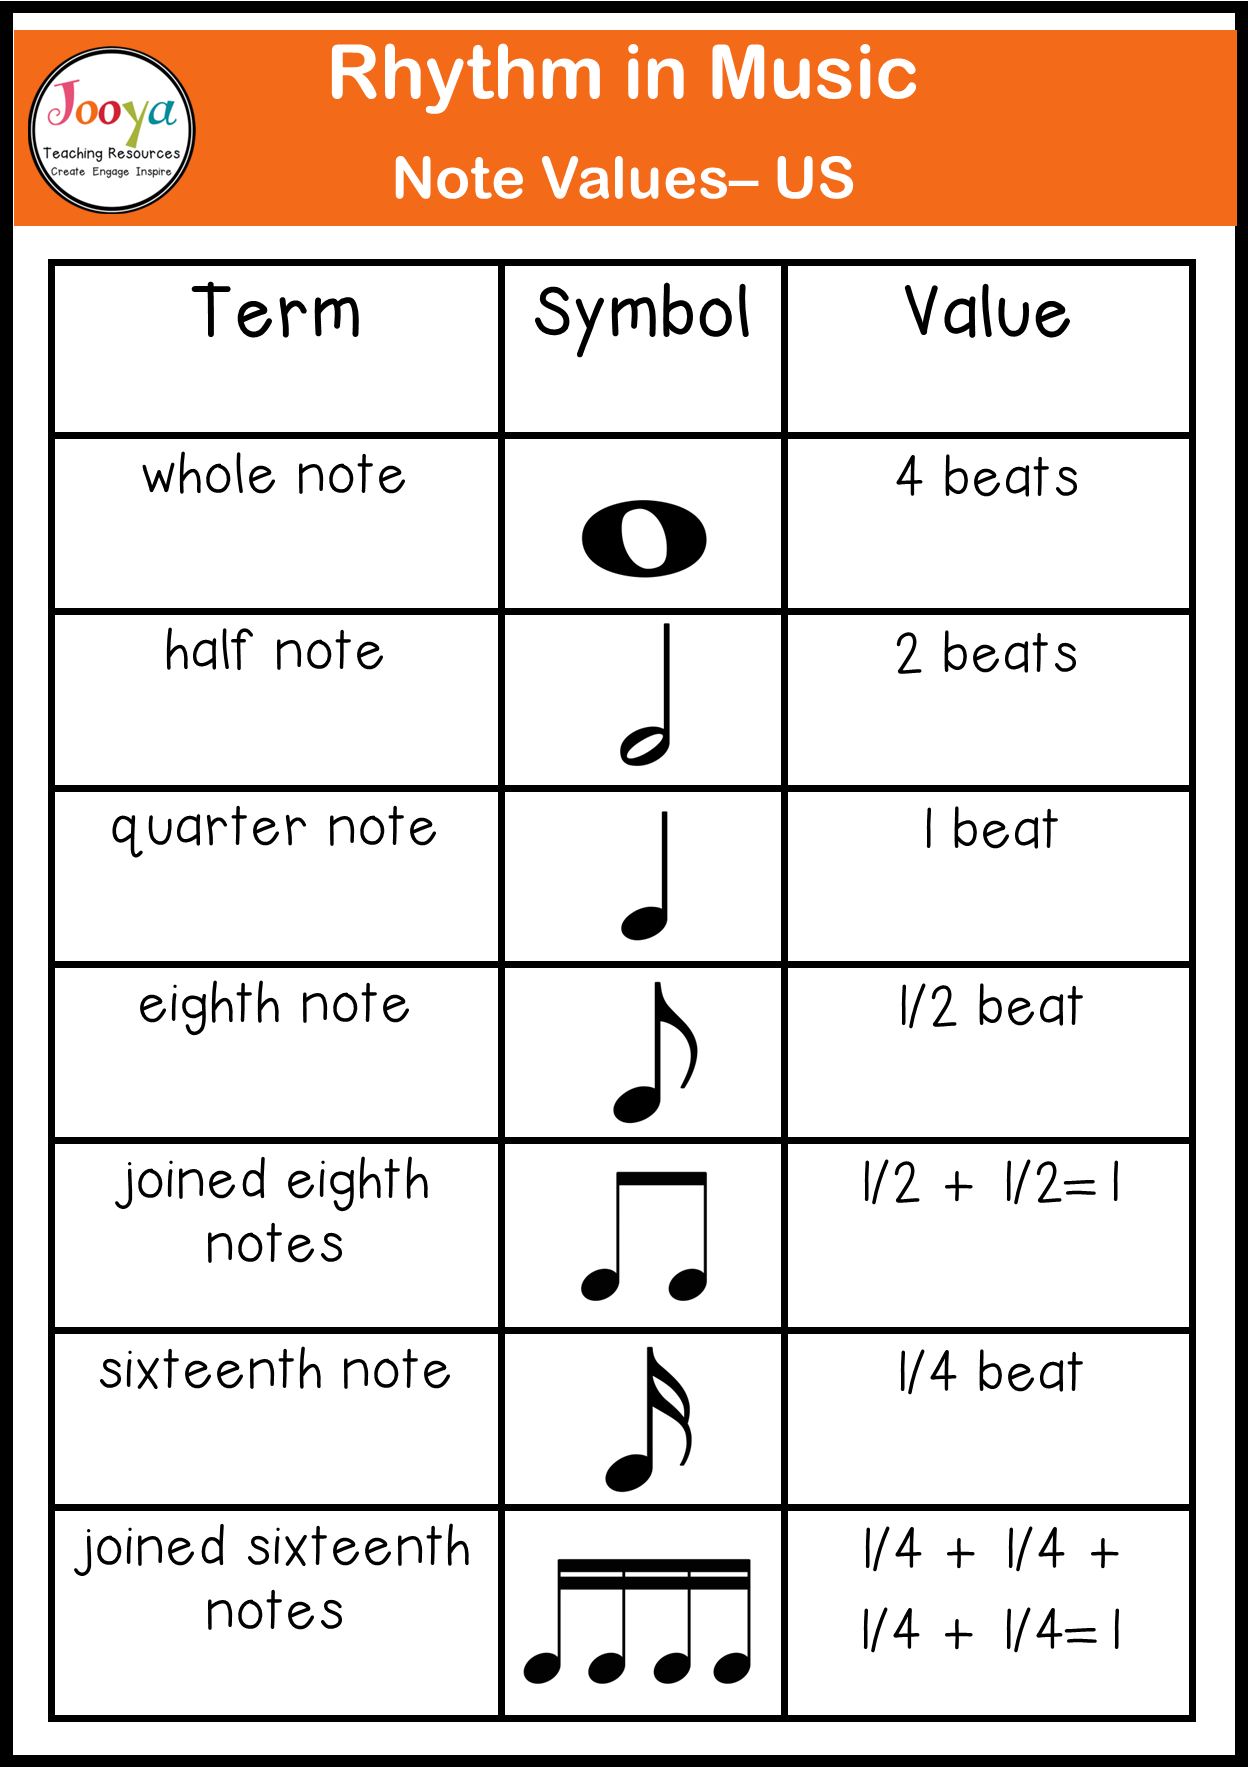
Think of note values as the building blocks of musical time. Each note symbol represents a specific duration, typically measured in beats. Here is the essential family of notes you need to know, from the longest to the shortest.
Whole Notes to Sixteenth Notes
- Whole Note: This is the long, sustained note. It looks like a hollow oval and has no stem. In common time (4/4), it receives 4 full beats. It’s the foundation upon which other rhythms are built.
- Half Note: A half note is half the value of a whole note. It appears as a hollow oval with a stem. It receives 2 beats.
- Quarter Note: This is the workhorse of rhythm and often feels like one single pulse or beat. It’s a solid black oval with a stem. It receives 1 beat.
- Eighth Note: When you need to move faster, eighth notes come into play. An eighth note is a solid black oval with a stem and a single flag. One eighth note receives half a beat. They are often connected by a beam. When counted out loud, we typically use “and” (&) for the second half of the beat (e.g., “1 & 2 & 3 & 4 &”).
Here is a simple table to visualize their relationships:
| Note Name | Symbol | Duration (in 4/4 time) | How to Count It |
|---|---|---|---|
| Whole Note | ◯ | 4 beats | 1 – 2 – 3 – 4 |
| Half Note | 𝅗𝅥 | 2 beats | 1 – 2 |
| Quarter Note | 𝅘𝅥 | 1 beat | 1 |
| Eighth Note | 𝅘𝅥𝅮 | 1/2 beat | 1 & |
Rest Symbols and Their Meanings
Music is made up of both sound and silence. Rests are the symbols that tell you when not to play, and they are just as important as the notes. Every note value has a corresponding rest symbol of equal duration.
Silent Beats Matter
- Whole Rest: A small rectangle that hangs down from the fourth line. It signifies 4 beats of silence.
- Half Rest: A small rectangle that sits on the third line. It signifies 2 beats of silence.
- Quarter Rest: A symbol that looks a bit like a squiggly line. It signifies 1 beat of silence.
- Eighth Rest: A symbol with a single flag, resembling the number “7”. It signifies half a beat of silence.
| Rest Name | Symbol | Duration (in 4/4 time) |
|---|---|---|
| Whole Rest | 𝄻 | 4 beats |
| Half Rest | 𝄼 | 2 beats |
| Quarter Rest | 𝄽 | 1 beat |
| Eighth Rest | 𝄾 | 1/2 beat |
Practice Exercise: Clapping Rhythms with Rests
The best way to internalize rhythm is to feel it. Try clapping this simple two-bar rhythm in 4/4 time. Say the counts out loud as you clap on the notes and stay silent for the rests.
Bar 1: Quarter Note (clap), Quarter Note (clap), Half Note (clap and hold)
Count:     1                 2                 3      -     4

Bar 2: Quarter Note (clap), Eighth Rest (silence), Eighth Note (clap), Quarter Note (clap), Quarter Rest (silence)
Count:     1                         &                   2                3                 4
Mastering the relationship between notes and rests gives you the power to bring the written page to life with its intended groove and feel. To build a rock-solid rhythmic foundation through interactive exercises and personalized feedback, the Simply Piano program is an excellent tool for your journey. Discover how it can help you at https://www.hellosimply.com.
Time Signatures and Measures: Musical Mathematics
Now that you’re familiar with the individual notes and rests that create rhythm, it’s time to organize them into a coherent structure. This is where time signatures and measures come in, acting as the architectural blueprint for your musical piece.
Decoding Time Signatures
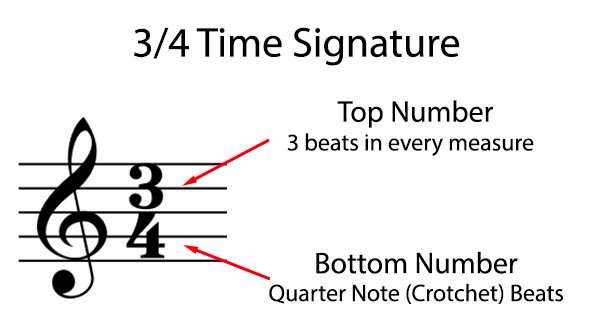
You’ll find the time signature at the very beginning of a piece of music, right after the clef and key signature. It consists of two numbers, one stacked on top of the other. Don’t let this fraction-like symbol intimidate you; its meaning is straightforward.
- The top number tells you how many beats are in each measure.
- The bottom number tells you what type of note gets one beat (4 represents a quarter note, 8 represents an eighth note, etc.).
Common Time Signatures Explained
Let’s break down the three most common time signatures you will encounter in 2025.
- 4/4 Time (Common Time): This is the most popular time signature. The top “4” means there are four beats per measure. The bottom “4” means the quarter note gets one beat. You can count it as “1, 2, 3, 4.” It’s so common that it’s often represented by the symbol “C” instead of “4/4.”
- 3/4 Time (Waltz Time): This time signature gives music a graceful, triple feel. The top “3” means there are three beats per measure. The bottom “4” means the quarter note gets one beat. You count it as “1, 2, 3.” It’s the signature rhythm of waltzes.
- 6/8 Time (Compound Meter): This one feels different. The top “6” means there are six pulses per measure. The bottom “8” means the eighth note gets one pulse. However, these six pulses are typically grouped into two larger beats, each containing three eighth notes. You often feel it in two, counted as “1 – 2 – 3, 4 – 5 – 6” or simply “1, 2.”
| Time Signature | Beats per Measure | Note that Gets 1 Beat | Common Counting Pattern |
|---|---|---|---|
| 4/4 | 4 | Quarter Note | 1, 2, 3, 4 |
| 3/4 | 3 | Quarter Note | 1, 2, 3 |
| 6/8 | 6 | Eighth Note | 1-2-3, 4-5-6 |
Measure Organization
Measures (or bars) are the segments created by vertical bar lines that cross the staff. They are the containers that hold the exact number of beats specified by the time signature.
Bar Lines and Musical Phrases
Bar lines do more than just separate beats; they help organize music into larger ideas called phrases.
- Single Bar Line: This is a single vertical line. Its primary job is to separate one measure from the next, keeping the beat count organized.
- Double Bar Line: This is two vertical lines, usually of the same thickness. It signifies a major section change, like the end of a verse or chorus, or the conclusion of the entire piece.
Practice: Identifying Phrase Boundaries
Look at the simple melody below. Notice how the double bar line marks the end of a complete musical thought (a phrase), while the single bar lines simply keep the 4/4 time organized measure by measure. Try tapping the rhythm while noticing how the music breathes at the end of each phrase.
Measure 1 | Measure 2 | Measure 3 | Measure 4 || (Double Bar Line - End of Phrase)
Understanding time signatures and measures unlocks the ability to see the larger rhythmic structure of a piece. To practice keeping a steady beat and internalizing different time signatures with instant feedback, exploring a structured learning path can make all the difference. The Simply Piano app is designed to guide you through these very concepts. You can start your journey at https://www.hellosimply.com.
Advanced Elements: Bringing Music to Life
Now that you can navigate the rhythmic framework of a piece, it’s time to explore the elements that give music its unique color and emotional depth. These symbols and notations are what transform notes on a page into a living, breathing performance.
Key Signatures and Accidentals
Key signatures are your first clue to the overall sound of a piece. Located right after the clef at the beginning of each staff, they tell you which notes are to be consistently played higher or lower throughout the music.
Understanding Tonality
A key signature is made up of a pattern of sharps (♯) or flats (♭). These symbols apply to every instance of that note letter in every octave, saving the composer from having to write an accidental before every single F♯ or B♭, for example.
- Sharps and Flats at the Beginning: If you see one sharp at the beginning of a staff, it’s always F♯. This means every F note you encounter should be played as F♯ unless otherwise indicated. The same logic applies to flats.
- Circle of Fifths: Pattern Recognition Technique: The circle of fifths is a brilliant visual tool that maps out the relationship between all key signatures. It shows a clear pattern: key signatures add sharps or flats in a specific order. For sharps, the order is F♯, C♯, G♯, D♯, A♯, E♯, B♯. For flats, the order is B♭, E♭, A♭, D♭, G♭, C♭, F♭. Recognizing this pattern makes identifying the key much faster.
Temporary Pitch Changes
Sometimes, a composer wants to alter a note’s pitch only temporarily. This is where accidentals come into play.
- Accidentals: Sharps, Flats, and Naturals Within Measures: An accidental is a symbol placed before a note within a measure to change its pitch.
- A sharp (♯) raises a note by one half-step.
- A flat (♭) lowers a note by one half-step.
- A natural (♮) cancels a previous sharp or flat, returning the note to its original, “white key” pitch.
- Rules: Apply to the Entire Measure Unless Canceled: A crucial rule to remember is that an accidental applies to all subsequent notes of the same pitch for the remainder of that measure. It is automatically canceled by the next bar line. For example, if an F is marked as F♯ in measure 3, every other F in measure 3 is also an F♯. When you reach measure 4, the F returns to whatever the key signature dictates (unless another accidental is used).
Dynamics and Expression Marks
While notes and rhythm tell you what to play and when, dynamics and articulation tell you how to play it. This is the heart of musical expression.
Volume Control in Music
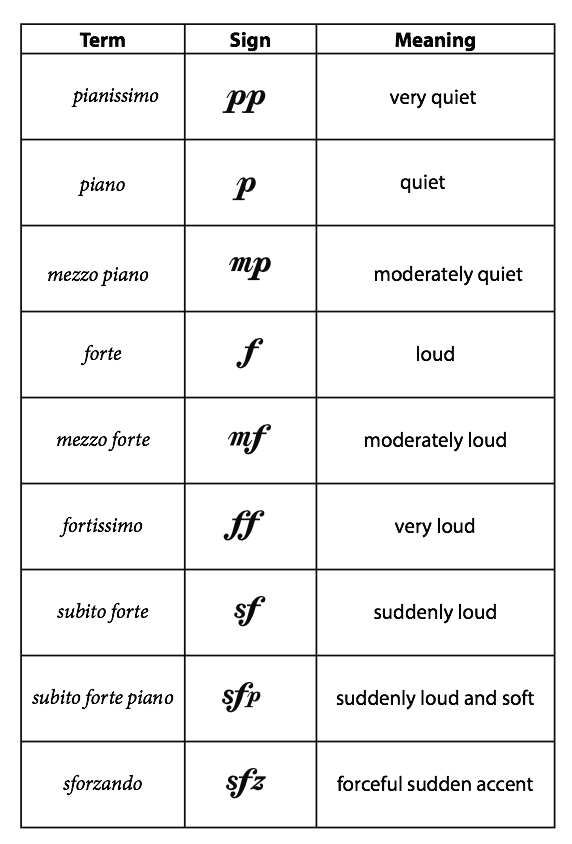
Dynamics are indicators of volume, ranging from very soft to very loud. They are usually abbreviated with Italian terms.
- Piano (p) to Forte (f) Spectrum: The two most common dynamic markings are piano (p) for soft and forte (f) for loud. These can be combined for intermediate levels, such as mezzo-piano (mp) for moderately soft and mezzo-forte (mf) for moderately loud. Adding more p’s or f’s intensifies the effect (e.g., pp for pianissimo, very soft).
- Crescendo and Decrescendo: Gradual Changes: Music rarely stays at one volume. A crescendo (or the symbol “<“) indicates a gradual increase in volume. A decrescendo (or the symbol “>”) indicates a gradual decrease in volume. These symbols are often placed underneath a passage of music to show exactly where the volume should change.
Articulation Symbols
Articulation defines the character and connection between notes.
- Staccato: Short, Detached Notes: A small dot placed above or below a note head means you should play the note short and detached. The note retains its rhythmic value, but you release it early, creating space before the next note.
- Legato: Smooth, Connected Notes: A curved line (a slur) connecting two or more notes of different pitches indicates legato. You should play these notes smoothly and connected, with no silence between them. For notes of the same pitch, a curved line is a tie, which combines their rhythmic values into one continuous sound.
- Accent: Emphasized Notes: A small “>” symbol placed above or below a note head means that note should be played with a strong emphasis or attack. It should stand out from the notes around it.
Mastering these advanced elements allows you to move beyond simply playing the correct notes and into the realm of true musical interpretation. To hear and feel the difference these markings make in real music, nothing beats guided, interactive practice. The Simply Piano app provides immediate feedback on your dynamics and phrasing, helping you bring the notes to life. Continue your musical journey with their dedicated lessons at https://www.hellosimply.com.
Practice Strategies: From Beginner to Fluent Reader
Building on your understanding of dynamics and expression, the next step is to integrate these elements into a structured practice routine. Reading sheet music is a physical skill for your eyes and brain, much like learning a new language, and it flourishes with consistent, mindful practice.
Building a Consistent Practice Routine
The key to rapid progress is not the length of your practice sessions, but their quality and regularity. Short, daily sessions are far more effective than infrequent, long ones.
Daily Exercises That Deliver Results
Your goal is to make note recognition and rhythmic reading an automatic process. Here are two foundational exercises to incorporate into your daily practice:
- 10-minute focused reading sessions: Dedicate a mere ten minutes each day exclusively to reading new material. This could be a brand-new piece of music or a dedicated sight-reading book. The focus is purely on decoding the symbols on the page without the pressure of performance.
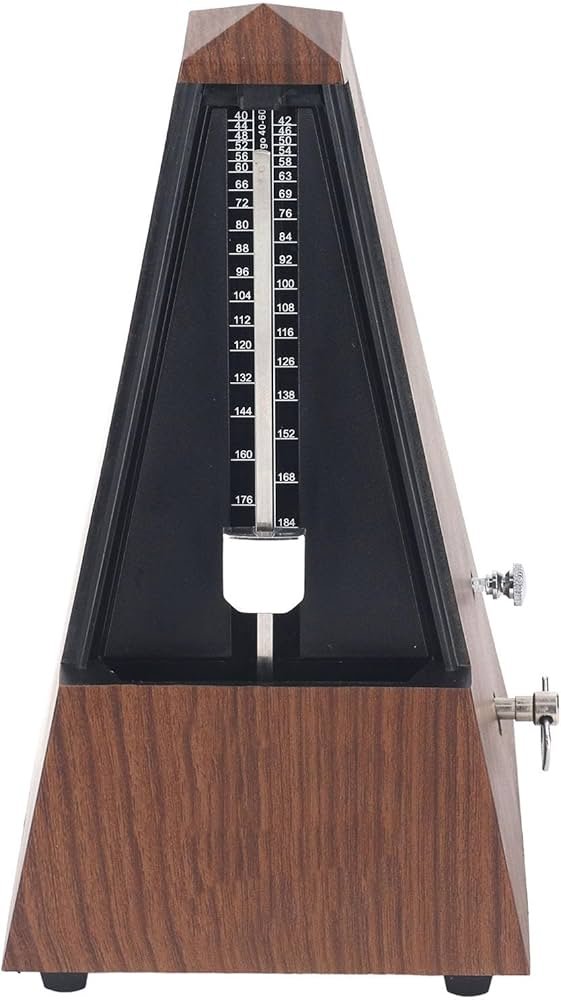
- Metronome practice: Starting at 60 BPM: A metronome is your best friend for developing a steady internal pulse. When practicing a new piece or a challenging rhythm, always start at a slow, manageable tempo, such as 60 beats per minute (BPM). This allows you to process the notes, rhythms, and fingerings accurately before gradually increasing the speed.
Progressive Difficulty Approach
To avoid frustration and ensure steady improvement, structure your learning journey by gradually increasing complexity. A sample 2-month plan could look like this:
| Time Period | Focus Area | Key Activities |
|---|---|---|
| Week 1-2 | Single-line melodies | Reading melodies on the treble clef only, then bass clef only, using whole, half, and quarter notes. |
| Week 3-4 | Simple hands-together pieces | Coordinating both hands with simple, block chords in the left hand and a melody in the right. |
| Month 2 | Incorporating dynamics and expression | Adding the p, f, crescendo, and legato/staccato markings from your previous studies into your pieces. |
Sight-Reading Development
Sight-reading is the art of playing a piece of music for the first time, and it’s a separate skill from practiced performance. It’s about fluency and keeping the musical flow intact.
Techniques for Immediate Improvement
Before you play a single note, take a moment to “pre-read” the music. This 30-second analysis will dramatically increase your success rate.
- Pre-scanning: 30-second piece analysis: Use this time to identify the key signature and time signature, look for repeating rhythmic or melodic patterns, notice any tricky leaps or accidentals, and scan the dynamics and articulation marks.
- Pattern recognition: Scales and arpeggios: So much of music is built from scales and arpeggios (broken chords). By practicing these in all keys, you are essentially pre-learning the “words” and “phrases” you will encounter in your sheet music, making them instantly recognizable.
- Keep going principle: Never stop for mistakes: The single most important rule in sight-reading is to maintain the pulse. If you make a mistake, do not stop to correct it. Let it go and focus on finding your place and coming in correctly on the next beat or measure. The goal is musical continuity.
Measuring Progress
To stay motivated and see tangible improvement, it’s helpful to track your development.
- Weekly sight-reading challenges: Once a week, give yourself a formal sight-reading challenge. Pick a piece you have never seen before, set a timer for your 30-second pre-scan, and then play it through from start to finish without stopping.
- Recording and analyzing performances: Use your phone to record your weekly sight-reading challenges. Listening back allows you to objectively analyze where you struggled rhythmically, which notes were missed, and how well you observed the dynamic and expression marks. This self-feedback is invaluable for targeting your practice.
The journey from decoding individual notes to fluent reading is incredibly rewarding. For a structured path that adapts to your pace and provides instant feedback on your rhythm and note accuracy, tools like Simply Piano are designed to support this exact skill development. You can explore their comprehensive sight-reading curriculum in 2025 at https://www.hellosimply.com.
Instrument-Specific Applications
Now that you have a solid practice framework, let’s explore how to apply these reading skills to specific instruments. Each instrument presents its own unique challenges and uses notation in slightly different ways. Understanding these nuances will make you a more versatile and confident musician.
Piano Sheet Music Reading
The piano is one of the few instruments that requires you to read two lines of music simultaneously—the Grand Staff. This can seem daunting, but with a systematic approach, you can master the coordination.
Grand Staff Coordination
The Grand Staff is simply the Treble Clef and Bass Clef connected together. Your brain learns to process them as a single, unified system.
- Right hand: Treble clef melodies: Typically, your right hand plays the higher-pitched notes found in the treble clef. This often carries the main melody of the piece. Think of it as the “singer” in your performance.
- Left hand: Bass clef accompaniment: Your left hand generally manages the lower-pitched notes in the bass clef. This part provides the harmonic foundation and rhythm, often through chords, bass lines, or supportive patterns.
- Practice method: Hands separately then together: This is the golden rule for piano practice. Never try to tackle both hands at once from the beginning.
- Right Hand Alone: Play through the entire treble clef line until it feels smooth and secure.
- Left Hand Alone: Do the same for the bass clef line. Master its rhythm and fingering independently.
- Hands Together: Start combining them. Begin at an extremely slow tempo, focusing only on coordination. The metronome set to a very slow 50-60 BPM is essential here. Gradually increase the speed as your hands learn to work in unison.
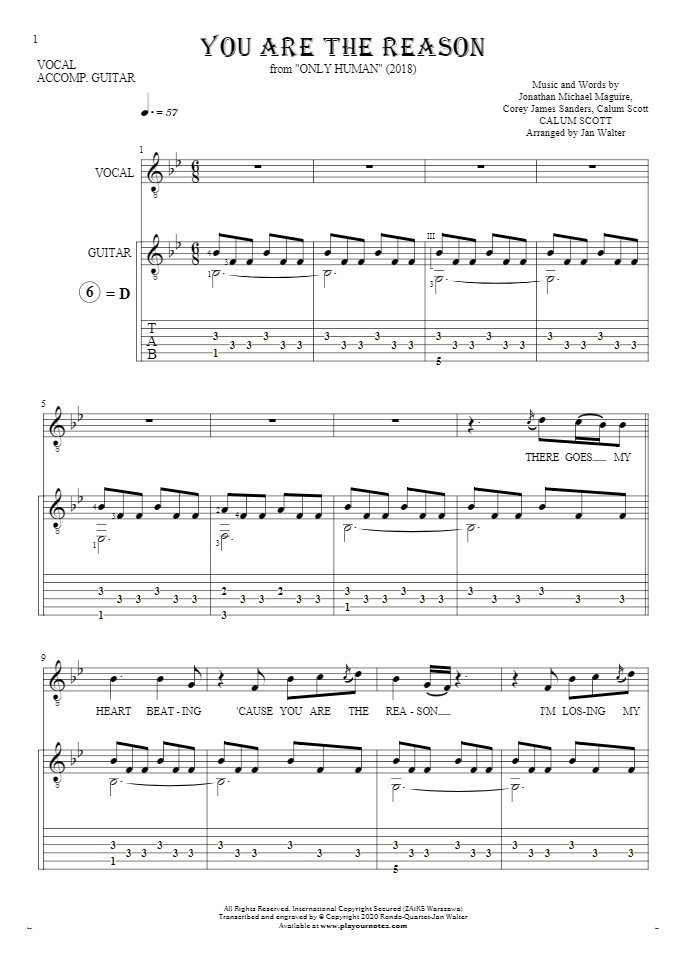
Guitar Notation and Tablature
Guitarists have the advantage of two parallel systems for reading music: standard notation and tablature (TAB). Each has its strengths, and modern sheet music often includes both.
Standard Notation vs. TAB
Understanding the difference between these systems is key to becoming a well-rounded guitarist.
- Standard notation: Rhythm and pitch precision: Standard notation tells you the exact pitch and duration of each note. It is the universal language of music and is essential for understanding the complete musical picture, including dynamics, expression, and harmony. It does not, however, tell you where to play the note on the guitar neck.
- TAB: Fingering position clarity: Tablature is a direct visual representation of the guitar’s fretboard. The six lines represent the six strings, and the numbers tell you which fret to press down. TAB is excellent for quickly learning where to place your fingers, but it often lacks precise rhythmic information and doesn’t teach you about the actual pitches you are playing.
- Hybrid approach: Using both systems: The most effective way to read guitar music is to use both systems together. Use the standard notation to understand the rhythm and the exact notes you are playing. Then, use the TAB as a quick reference for the most efficient fingering on the fretboard. This hybrid approach gives you the best of both worlds.
Vocal Music Reading
For singers, the sheet music is your guide to pitch, rhythm, and—crucially—breathing. Your instrument is your body, and the notation provides specific instructions for how to use it.
Singing from Sheet Music
Reading as a vocalist involves more than just knowing which note to sing.
- Pitch accuracy exercises: Practice singing scales and arpeggios on solfège syllables (Do-Re-Mi) or a neutral vowel. This trains your ear and your voice to hit intervals accurately. When sight-reading a new piece, quietly hum or solfège the melody first before adding the text.
- Rhythm counting while singing: Vocal music can have complex rhythms. It is vital to internalize the pulse. Tap your foot to the beat and count the subdivisions aloud (“1-and-2-and”) before you even attempt to sing the pitches. This separates the challenge of rhythm from the challenge of pitch.
- Breath marks and phrasing: Look for the apostrophe-like symbol (
') which indicates a breath mark. Your phrasing—how you shape a musical line—is dictated by these marks and the lyrical sentences. Plan your breaths strategically so they don’t interrupt the musical flow. A slur mark also indicates a musical phrase that should be sung in a single breath.
Mastering the reading style for your specific instrument will accelerate your progress. For those looking for a guided, interactive approach to learning these skills on piano or guitar, tools like Simply Piano and Simply Guitar offer personalized lessons that adapt to your learning speed. You can begin your tailored musical journey in 2025 at https://www.hellosimply.com.
Common Challenges and Solutions
Learning to read sheet music is a journey with incredible highs, but it’s also common to encounter plateaus where progress seems to stall. The key is not to get discouraged but to recognize these moments as opportunities to refine your strategy. Let’s explore some common hurdles and practical, encouraging solutions to help you move forward with confidence.
Overcoming Reading Plateaus
Hitting a plateau can feel frustrating, but it’s a natural part of the learning process. It often means your brain is consolidating new information before making the next leap. The most effective way to break through is to shift your practice focus from passive recognition to active, strategic thinking.
Breaking Through Skill Barriers
A frequent bottleneck for many musicians is the speed at which they process notes. If you find yourself counting lines and spaces for every single note, you’re likely experiencing this challenge.
- Problem: Note recognition speed. The primary issue is a reliance on slow, sequential processing (e.g., “Every Good Boy Does Fine”) instead of instantaneous, parallel recognition. This slows down your reading and makes it difficult to keep up with the music.
- Solution: Interval recognition training. Instead of identifying every note individually, train your brain to see the distance, or interval, between notes. For example, if you know the first note is a C, and the next note is on the very next line, you can instantly recognize it as a third above (an E) without having to name the line. Practice by looking at simple melodies and identifying whether the notes move by step (seconds), skip (thirds), or leap (fourths, fifths, etc.). Flashcards and sight-reading apps are excellent for this.
- Result: 40% faster reading in 2 weeks. By consistently practicing interval recognition for just 10-15 minutes a day, many students report a significant increase in their reading fluency within a short period. Your brain starts to process groups of notes as shapes and patterns, which is the secret to fluent sight-reading.
Maintaining Motivation
Sustained progress in music reading relies as much on emotional and psychological factors as it does on technical practice. Keeping your motivation alive is crucial for long-term success.
Setting Achievable Goals
Large, vague goals like “become a good sight-reader” can feel overwhelming. The solution is to break the journey down into small, manageable, and celebratory steps.
- Monthly repertoire targets. Instead of focusing only on exercises, set a specific, achievable goal for each month. This could be, “I will learn to play/sing one new simple piece from start to finish this month,” or “I will master reading in the key of G major this month.” This connects your reading practice directly to the joy of making music.
- Celebration of small victories. Did you finally nail that tricky rhythm? Did you sight-read a four-bar phrase without stopping? Celebrate it! Acknowledge every bit of progress. This positive reinforcement builds a virtuous cycle where practice feels rewarding, making you want to come back for more.
- Community engagement: Joining reading groups. Music is meant to be shared. Look for or start a sheet music reading group, either in person or online. Playing duets with a friend, joining a choir, or participating in a community band provides a social deadline, makes the process fun, and shows you that everyone is on their own unique learning path. Sharing the challenge makes it lighter.
Remember, the path to fluent music reading is a marathon, not a sprint. Be patient with yourself and trust the process. For a structured and supportive approach that helps you set and achieve these musical goals, platforms like Simply Piano and Simply Guitar provide a daily guided path. You can continue building your skills and confidence in 2025 by exploring lessons at https://www.hellosimply.com.
Resources and Next Steps
Now that you have strategies to overcome challenges and maintain motivation, it’s time to equip yourself with the right tools and look ahead. Building a fluent reading ability is an ongoing process, and having a clear path forward will keep your momentum strong. Let’s explore some excellent resources to solidify your foundation and consider the exciting directions your musical journey can take.
Recommended Practice Materials
Consistent practice with the right materials is the fastest way to internalize your music reading skills. The key is to use resources that are appropriate for your current level to ensure steady, encouraging progress.
Beginner-Friendly Sheet Music
Jumping into complex music too soon can be discouraging. Start with materials designed specifically for developing musicians.
| Resource Type | Specific Examples | Key Benefit |
|---|---|---|
| Method Books | Alfred’s Basic Piano Library, Hal Leonard Student Piano Library | Provides a structured, sequential curriculum that gradually introduces new notes and concepts. |
| Online Libraries | IMSLP (International Music Score Library Project) | Offers a vast, free collection of public domain scores, including many simple classical études and pieces. |
| Mobile Apps | Note trainers like Music Tutor, Tenuto | Offers gamified, on-the-go practice for instant note and rhythm recognition, reinforcing your core skills. |
When selecting pieces, choose ones where you can recognize most of the notes immediately, with only a few new challenges. This builds confidence and fluency.


No comment